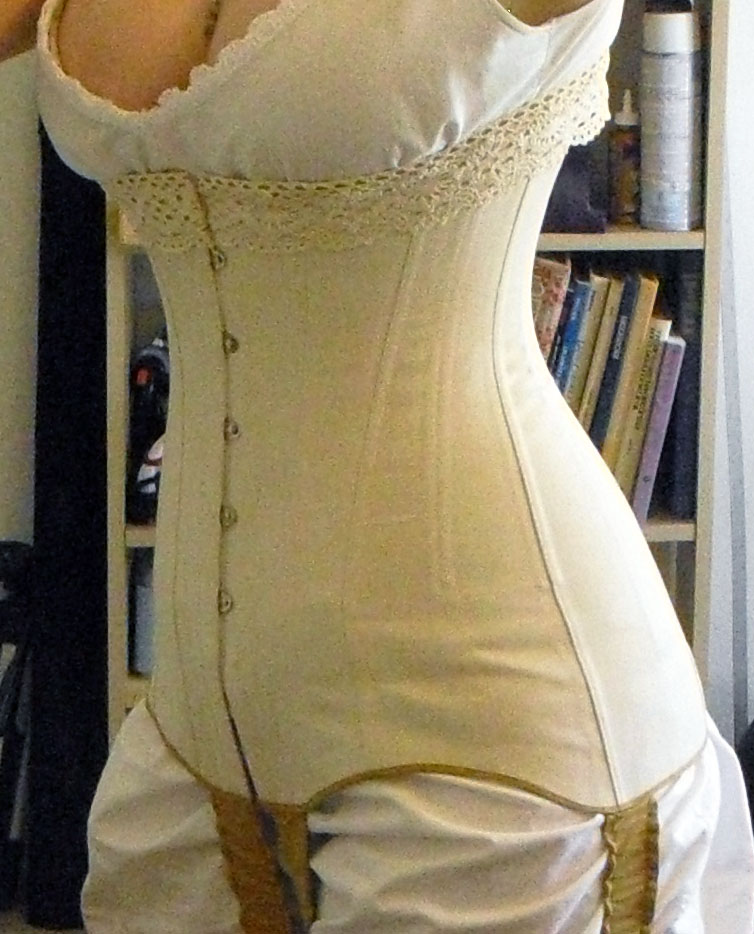
I'd intended to have a post about my Titanic gown done today, but time got away from me and I'm still writing it! I'll have it up tomorrow, but in the meantime here's a teaser shot of one of my favorite parts of the gown.
Until tomorrow!
August 24, 2012
August 22, 2012
Teens Corset (for reals this time)
Accidentally hit "publish" instead of "save" yesterday while writing this, so sorry to y'all who may have briefly seen it half done! Anyways, here goes, for real this time.
Yesterday's post reminds me that there are lots of things I still haven't gotten around to showing you, so this week will be all about catching up. Remember those saris? I did manage to knock out one Titanic dress from that stash, then got stalled halfway through a second one. But before I show you the completed dress I should show you the corset I made to go under it! I no longer own this corset; due to fitting issues I wore it twice then gave it away to Lauren, who says it fits perfectly. I've cobbled the following together from photos and notes I took before I sent it on its merry way. Despite the fitting issues, I learned a LOT from this one!
While I've made several corsets in modern and mid-Victorian styles, teens corsets were something I've never studied or attempted before. Luckily, the fabulous Jo at Bridges on the Body started up a 1911 corset sew along! Her posts cover every part of the process from beginning to end and made tackling this project much less scary. Of course, despite my best intentions I didn't end up sewing along with everyone else at all; rather I got mine started just as everyone was finishing.
I chose to use the Post Edwardian Longline pattern she provided rather than the Corsets and Crinolines one. I wanted this to be as easy as possible and didn't want to deal with the gussets on the latter. I blew up the pattern and made a mockup (forgot to take photos of that apparently). I found that while the waist seemed like it would be OK, my butt ended up super squished. The corset was also too short and needed a touch more room in the top. I raised the top one inch, added an inch to the upper back and two inches to the butt.
I was in a hurry so I decided to not make a new mock up to assess the changes. If I had, I would have found that I still needed to add space in the mid hip. I also needed to add a bit to the waist; even though it's the same width as other corsets I own it still doesn't fit right. Since this style has the waistline sitting a bit higher than earlier corsets the tightest part is actually directly on my ribcage where I don't squish so well. When I made the original mock up I thought the reason I couldn't close the waist further was because the hip area wasn't laced anywhere near closed. I thought the problem would be solved by the addition of those two inches at the low hip. Adding to the hips of other corsets I've made has allowed me to lace the waist tighter before (see Cathy Hay's discovery of the extra room effect), so it wasn't a completely stupid assumption. Even so, I should know that when tackling a completely new style of corset one shouldn't assume that everything will work the same!
I made the corset out of cream coutil with a patterned quilter's cotton for the lining. A mustardy organic cotton served as bias binding and covers the garter straps. I had planned to use a matching twill tape for the waist tape but ended up skipping that part. I also bought some golden Japanese embroidery thread with the intention of doing some flossing, but that didn't happen either!
Lazyness prompted me to use purchased casing for the boning channels. I should know by know that laziness doesn't pay. The casing can fit two bones side by side, but juuuuuust barely. In order to get them perfect, I had to hand baste the channels exactly where they needed to go, then carefully stitch about 1/16 of an inch in from either edge. Then I could remove the basting stitches and carefully stitch down the exact center. I was a liiiiittle bit off on some and as a result it was difficult to shove the boning in, but I managed.
I screwed up when placing the grommets. I like to punch a tiny hole where each grommet will go, but this time I got overzealous and didn't notice that part of the corset got folded underneath the rest while I was hammering away!
Luckily the damage is to the very top part of the corset. It won't be taking much stress at all, and will be covered by lace. Some quick stitching later, the holes were patched and the problem was solved. I highly doubt that anyone would even notice it in the finished corset!
This type of corset doesn't fasten all the way down the front; the busk ends several inches short of the bottom. The bones end around the same point. The two front halves can then open up when you sit or take long strides. This design lets the corset be extra long to provide smooth shaping, but still allows you to move. I loved the long line, but decided I wasn't a fan of the extra fabric over the front of my thighs, nor the super straight line of the bottom. There's also some wrinkling in the lower third; that's because there aren't any garters to pull the edge downwards yet.
To pretty it up I carved out some curves just above each thigh. I bound the edges with a thin bias tape made from the mustard cotton and added some pretty lace around the top. I attached garters at the center front and sides, then clipped them to my stockings to pull the corset into alignment. What a difference!
Yesterday's post reminds me that there are lots of things I still haven't gotten around to showing you, so this week will be all about catching up. Remember those saris? I did manage to knock out one Titanic dress from that stash, then got stalled halfway through a second one. But before I show you the completed dress I should show you the corset I made to go under it! I no longer own this corset; due to fitting issues I wore it twice then gave it away to Lauren, who says it fits perfectly. I've cobbled the following together from photos and notes I took before I sent it on its merry way. Despite the fitting issues, I learned a LOT from this one!
While I've made several corsets in modern and mid-Victorian styles, teens corsets were something I've never studied or attempted before. Luckily, the fabulous Jo at Bridges on the Body started up a 1911 corset sew along! Her posts cover every part of the process from beginning to end and made tackling this project much less scary. Of course, despite my best intentions I didn't end up sewing along with everyone else at all; rather I got mine started just as everyone was finishing.
I chose to use the Post Edwardian Longline pattern she provided rather than the Corsets and Crinolines one. I wanted this to be as easy as possible and didn't want to deal with the gussets on the latter. I blew up the pattern and made a mockup (forgot to take photos of that apparently). I found that while the waist seemed like it would be OK, my butt ended up super squished. The corset was also too short and needed a touch more room in the top. I raised the top one inch, added an inch to the upper back and two inches to the butt.
![]() |
| The pattern with my additions taped on |
I was in a hurry so I decided to not make a new mock up to assess the changes. If I had, I would have found that I still needed to add space in the mid hip. I also needed to add a bit to the waist; even though it's the same width as other corsets I own it still doesn't fit right. Since this style has the waistline sitting a bit higher than earlier corsets the tightest part is actually directly on my ribcage where I don't squish so well. When I made the original mock up I thought the reason I couldn't close the waist further was because the hip area wasn't laced anywhere near closed. I thought the problem would be solved by the addition of those two inches at the low hip. Adding to the hips of other corsets I've made has allowed me to lace the waist tighter before (see Cathy Hay's discovery of the extra room effect), so it wasn't a completely stupid assumption. Even so, I should know that when tackling a completely new style of corset one shouldn't assume that everything will work the same!
I made the corset out of cream coutil with a patterned quilter's cotton for the lining. A mustardy organic cotton served as bias binding and covers the garter straps. I had planned to use a matching twill tape for the waist tape but ended up skipping that part. I also bought some golden Japanese embroidery thread with the intention of doing some flossing, but that didn't happen either!
![]() |
| Well at least I ended up using half this stuff |
Lazyness prompted me to use purchased casing for the boning channels. I should know by know that laziness doesn't pay. The casing can fit two bones side by side, but juuuuuust barely. In order to get them perfect, I had to hand baste the channels exactly where they needed to go, then carefully stitch about 1/16 of an inch in from either edge. Then I could remove the basting stitches and carefully stitch down the exact center. I was a liiiiittle bit off on some and as a result it was difficult to shove the boning in, but I managed.
I screwed up when placing the grommets. I like to punch a tiny hole where each grommet will go, but this time I got overzealous and didn't notice that part of the corset got folded underneath the rest while I was hammering away!
![]() |
| Whoops! |
Luckily the damage is to the very top part of the corset. It won't be taking much stress at all, and will be covered by lace. Some quick stitching later, the holes were patched and the problem was solved. I highly doubt that anyone would even notice it in the finished corset!
![]() |
| What? It'll be covered up in the end. |
This type of corset doesn't fasten all the way down the front; the busk ends several inches short of the bottom. The bones end around the same point. The two front halves can then open up when you sit or take long strides. This design lets the corset be extra long to provide smooth shaping, but still allows you to move. I loved the long line, but decided I wasn't a fan of the extra fabric over the front of my thighs, nor the super straight line of the bottom. There's also some wrinkling in the lower third; that's because there aren't any garters to pull the edge downwards yet.
To pretty it up I carved out some curves just above each thigh. I bound the edges with a thin bias tape made from the mustard cotton and added some pretty lace around the top. I attached garters at the center front and sides, then clipped them to my stockings to pull the corset into alignment. What a difference!
The back doesn't close as much as I wanted to, but that's what I get for not making a second mockup. You can see that there's a flat spot in the back mid hip where there isn't enough space in the corset and it just smooshes my butt down. The corset isn't laced all the way down because I ran out of silver 00 grommets and had to leave off the last two on one side.
![]() |
| The poor corset just can't handle all that junk in the trunk! |
Even better, I can sit it it!
![]() |
| Look at how well it maintains that smooth line all the way down the back! |
![]() |
| The busk is shorter than the corset so that it doesn't poke, and the bottom front edges split open. |
It certainly gives me the proper shape, and visually it appears to fit well enough. It also encourages the wearer to lean forward ever so slightly, adding to the proper fashionable silhouette. When I first wore it out I thought it was pretty comfortable for the first hour. Unfortunately, after that first hour it became a nightmare to wear! I'm not sure if it's just that the sizing is off, or it's the high placement of the waist that is problematic, or if the style of corset is just not my body's cup of tea. I think that the constant urge to lean a bit forward caused some of the issues. In any case, I learned a lot from this adventure, and the corset is happy in its new home. Everybody wins!
August 21, 2012
The Much Belated Dickens Dress Post
Silly me! I bought some fabric for this years Dickens Faire dress last week and thought about showing it to you today, but then I realized I never showed you the finished dress from last year!
I'd say it ended up fairly close to the original design plan. Due to a time crunch (I finished this the night before the last day of costume approval!) I ended up using a simpler design for the sleeves and not trimming them. As dresses go it's quite plain, but given that I was going for middle class I think it's just fine.
The main fabric is a lightweight herringbone brown wool with light blue and white stripes. I used a blue plaid wool fabric cut on the bias to trim the skirt. The skirt is simply three rectangles of fabric sewn together, lined with cotton and cartridge pleated to a waistband. It ended up a bit shorter than I originally planned, but I like my dance skirts on the shorter side anyways.
I'd say it ended up fairly close to the original design plan. Due to a time crunch (I finished this the night before the last day of costume approval!) I ended up using a simpler design for the sleeves and not trimming them. As dresses go it's quite plain, but given that I was going for middle class I think it's just fine.
The main fabric is a lightweight herringbone brown wool with light blue and white stripes. I used a blue plaid wool fabric cut on the bias to trim the skirt. The skirt is simply three rectangles of fabric sewn together, lined with cotton and cartridge pleated to a waistband. It ended up a bit shorter than I originally planned, but I like my dance skirts on the shorter side anyways.
The bodice is a heavily altered version of TV443. I shortened it, got rid of the double points in front and put in totally different sleeves. The seams are all piped with the blue wool fabric. The undersleeves are cotton and simply pinned in so that they can be easily removed for washing. Since this dress was going to see some heavy action I chose to sew the bodice to the skirt to avoid any threat of gaposis.
The bodice is flatlined with cotton organdy. Some choose a lightweight canvas for this purpose, but I found that the thin crisp organdy gave great structure and support and was light and super breathable to boot. I spent most of faire at Fezziwig's dancing my butt off, so having a light and breathable bodice was important! Oddly enough, I didn't bone the bodice at all. I think I simply ran out of time. During dress rehearsal I was quite surprised to find that you couldn't tell it didn't have boning! While it looks wrinkly on the mannequin, it lay pretty smoothly on my body, even while moving. I will be adding boning in before it gets worn again however, since it will still improve the overall appearance.
The back of the bodice didn't look nearly as good as the front. I had a terrible wrinkle issue there, but it appears to be because the back and sides are about three quarters of an inch too long. Pinching excess fabric out makes it lie perfectly, so at some point I'll have to disassemble the pieces and shorten them. Boning would certainly have helped, but there would still be too much fabric back there with no where to go.
I picked up a beautiful collar from a seller at the Dickens workshops. I've tacked it down so that it can easily be removed for washing.
The whole ensemble is worn over the bell-shaped hoops I made using my custom hoop drafting instructions. They've got a circumference of 95", so they're the perfect size for Faire.
I used Truly Victorian's free hoop petticoat instructions to make a petticoat out of cotton organdy. It looks a little worse for wear here, but that's because it's been through a season of Faire and is in need of a good washing!
I don't seem to have any good photos of me actually wearing the dress, which means this grainy iPhone image is the best you get for now. No idea why my petticoat suddenly decided it wanted attention, but there it is peeking out!
Bonus photo: Ty can't go go Faire, but that doesn't mean he can't play along at home!
August 15, 2012
August 2, 2012
Miles and Miles of Polka Dots
Well, I'm two days in and I already have a finished skirt! I'm still mulling over my design for the bodice, but I've got a few more days to get it made. In the meantime, here's the 411 on how the skirt went together:
The Plan
My basic design is a triple tiered skirt, with the tiers stitched to an underlying full length skirt. I decided on a finished skirt length of 45". Since there are three tiers, that meant that the visible portions of each tier would be 15" in length (red lines and text below). Of course, the tiers actually needed to overlap a bit, so that adds about two inches to the top edge of the second and third tiers (orange lines and text below). There isn't anything overlapping the top edge of the first tier, so it doesn't need those extra two inches.
All tiers needed seam allowance added to the top and bottom. I choose to add 1" to the top so I had a nice fat allowance for sewing it to the skirt, and a mere 1/4" to the bottom for a tiny rolled hem.
Skipping forward a bit, I'd like to point out why it's a good idea to sit down and do all the above math ahead of time and WRITE IT DOWN. I didn't. Instead I was doing it in my head as I went along. That resulted in this error-
I forgot to add those extra inches for overlap and seam allowance to the middle tier, which ended up leaving the top edge of the bottom tier exposed. I had to take a big tuck all around the middle of the underskirt to pull the bottom tier up two inches, leaving me with a skirt that is a bit short and barely covers my hoops. Thankfully, I also screwed up and made my third tier too long, so that tuck actually ended up making all the tiers look more or less equal in length again. Happy ending aside, don't be like me. Plan ahead and you'll stand a good chance of not f***ing up all your hard work.
Back to the math! I like to squeeze a fair amount of fabric into my skirts. To get that super full look and make sure that each tier had a proportionate amount of fabric, I measured the circumference of the skirt at the point where bottom edge of each tier would hit and tripled that measurement. For example- the hem of the skirt was 10 feet around, so I tripled that and gathered 30 feet of fabric for the bottom tier. Repeating that formula for the other two gave me 25 feet in the middle tier and 20 1/2 feet in the topmost tier.
The Actual Sewing
I ripped my fabric into the appropriate heights/widths for each tier (yay for ripping fabric!) and got to work on hemming. 75+ feet of fabric is a lot to hem, so to save my sanity I used my secret weapon- a narrow rolled hem foot. You feed your fabric into this lovely thing and it turns the edge over twice to encase the raw edge, then stitches it all down. It makes for a perfectly finished tiny little hem.
I set aside the tiers for a while to work on the underskirt. I draped a six panel gored skirt that fitted closely over my hoops and sewed it up in a basic white cotton fabric. (Edited to add: I forgot to mention I should have made it out of the same polka dot fabric so that the underskirt wouldn't stand out if one of the tiers flipped or flew up when dancing) I measured down 15" from the waistline to mark where the bottom edge of the first tier would fall, then another 15" down to mark the bottom edge of the middle tier. I drew lines 2" above each the first two lines to mark where the tiers would actually be sewn on.
I sewed three rows of gathering stitches along the top edge of each tier. Why not got the easier route and cord gather instead? Apparently I'm a masochist. Also, I completely forgot about cord gathering until I was about halfway through. Anyways, I figured three rows of gathering stitches would give me nice even gathers, plus some security against one of the threads breaking.
I gathered each tier to fit the skirt, then sewed them on upside down so that they'd have a little extra ompf when flipped down to show the right side.
Tier sewn on upside down
Sewing the first tier on wasn't so bad, but by the second and third ones the massive amount of fabric involved threatened to engulf my machine!
But bit by bit it all came together...
And finally, a finished triple tiered skirt!
Now for that bodice...
The Plan
My basic design is a triple tiered skirt, with the tiers stitched to an underlying full length skirt. I decided on a finished skirt length of 45". Since there are three tiers, that meant that the visible portions of each tier would be 15" in length (red lines and text below). Of course, the tiers actually needed to overlap a bit, so that adds about two inches to the top edge of the second and third tiers (orange lines and text below). There isn't anything overlapping the top edge of the first tier, so it doesn't need those extra two inches.
Oh look! A handy dandy visual aid!
All tiers needed seam allowance added to the top and bottom. I choose to add 1" to the top so I had a nice fat allowance for sewing it to the skirt, and a mere 1/4" to the bottom for a tiny rolled hem.
Skipping forward a bit, I'd like to point out why it's a good idea to sit down and do all the above math ahead of time and WRITE IT DOWN. I didn't. Instead I was doing it in my head as I went along. That resulted in this error-
This is bad. Don't do this.
I forgot to add those extra inches for overlap and seam allowance to the middle tier, which ended up leaving the top edge of the bottom tier exposed. I had to take a big tuck all around the middle of the underskirt to pull the bottom tier up two inches, leaving me with a skirt that is a bit short and barely covers my hoops. Thankfully, I also screwed up and made my third tier too long, so that tuck actually ended up making all the tiers look more or less equal in length again. Happy ending aside, don't be like me. Plan ahead and you'll stand a good chance of not f***ing up all your hard work.
Back to the math! I like to squeeze a fair amount of fabric into my skirts. To get that super full look and make sure that each tier had a proportionate amount of fabric, I measured the circumference of the skirt at the point where bottom edge of each tier would hit and tripled that measurement. For example- the hem of the skirt was 10 feet around, so I tripled that and gathered 30 feet of fabric for the bottom tier. Repeating that formula for the other two gave me 25 feet in the middle tier and 20 1/2 feet in the topmost tier.
The Actual Sewing
I ripped my fabric into the appropriate heights/widths for each tier (yay for ripping fabric!) and got to work on hemming. 75+ feet of fabric is a lot to hem, so to save my sanity I used my secret weapon- a narrow rolled hem foot. You feed your fabric into this lovely thing and it turns the edge over twice to encase the raw edge, then stitches it all down. It makes for a perfectly finished tiny little hem.
Mah super sekrit weapon
I set aside the tiers for a while to work on the underskirt. I draped a six panel gored skirt that fitted closely over my hoops and sewed it up in a basic white cotton fabric. (Edited to add: I forgot to mention I should have made it out of the same polka dot fabric so that the underskirt wouldn't stand out if one of the tiers flipped or flew up when dancing) I measured down 15" from the waistline to mark where the bottom edge of the first tier would fall, then another 15" down to mark the bottom edge of the middle tier. I drew lines 2" above each the first two lines to mark where the tiers would actually be sewn on.
I have nothing interesting to say about this photo
I gathered each tier to fit the skirt, then sewed them on upside down so that they'd have a little extra ompf when flipped down to show the right side.
Tier flipped down to cover seam allowance
Sewing the first tier on wasn't so bad, but by the second and third ones the massive amount of fabric involved threatened to engulf my machine!
My machine soldiers on, oblivious to the fact that it's about to be eaten by the very fabric it's trying to sew
But bit by bit it all came together...
As mentioned earlier, I sewed a tuck all around the middle of the underskirt to correct for the too-short middle tier. Last but not least I added a waistband (still have to sew on large hooks and eyes though).
And finally, a finished triple tiered skirt!
Now for that bodice...
July 31, 2012
One Week...
...to sew an entire day dress. I'm two tiers in and furiously gathering the third. My sewing machine and I are squatting in the conference room at work right now because I can't find the floor, table, ironing board or anything else in the disaster zone that is my sewing room. I'm taking photos like mad and I'll write the whole thing up when I'm done and have a moment to breathe, but for the meantime here's my progress.
The fabric is a sweet lightweight cotton with little blue/gray dots all over it. Best of all, it's WASHABLE. I love my silks and all, but sometimes you want a dress you can unceremoniously dump in the washing machine and not worry over. Given that this will make its debut at a picnic (grass, dirt, spilled food) I think I chose well :)
I have a weakness for squeezing as many yards of fabric into my skirt tiers as possible.
The fabric is a sweet lightweight cotton with little blue/gray dots all over it. Best of all, it's WASHABLE. I love my silks and all, but sometimes you want a dress you can unceremoniously dump in the washing machine and not worry over. Given that this will make its debut at a picnic (grass, dirt, spilled food) I think I chose well :)
June 29, 2012
Converting a Paper Pattern to a Laserable File
Subscribe to:
Posts (Atom)