Showing posts with label Titanic. Show all posts

August 25, 2012

Titanic Gown

So remember these?


As previously mentioned, I bought a couple ok lots of saris and dupattas in my quest to find a few that were crying out to be made into 1912 Titanic gowns.


This dupatta was one of my first purchases, and despite its tendency to get snagged on its own fabulous metal tambour embroidery I really wanted to use it.  I knew it was destined to be an overlay on the final dress, so I started draping it and a few salvaged scraps of sari borders on my mannequin to get some ideas...


Meanwhile I also thought a lot about the basic shape of the gown that would go under the dupatta fabric.  For some reason I find I really like the look of hobble skirts, but that fashion was right out as this was to be worn to a PEERS dance event.  I also loved the trained style of many teens dresses, but trains have a tendency to get stepped on when worn on a dance floor.  Then I saw this Paul Poiret evening dress at the KCI and had a sudden brainstorm.  At the bottom front the skirt silhouette appears to narrow, similar to a hobble skirt.  However, there is clearly a bunch of extra fabric at the back of the skirt that flows into a train.  Now it's entirely possible that the skirt is perfectly normal and it just looks like it narrows at the base due to the way it was arranged on the mannequin, but it gave me an idea.  


I draped a mockup of the skirt that was very fitted at the top, flowed into a wide curve over the hips, then swooped back at the bottom.  From the front, it appears to be similar to a hobble skirt.  The illusion holds so long as the skirt is viewed straight on.


But in the back, there's a bunch of extra fabric that's tamed by two large fitted inverted pleats that are stitched down to mid-butt level.  From there, the fabric is released and falls to the floor and into a very short train. The stitched down pleats ensure that the skirt holds the lovely fitted shape at the waist and over the hips, while below that the extra fabric ensures that one's legs have enough freedom to comfortably waltz.


It's weird and I don't have the slightest bit of proof that it's historical.  It's also pretty and makes me happy so I don't care.  And it's danceable! 

The pattern that resulted from this strange mishmash of styles looks somewhat odd.  It lacks the train and the angled waistline that I added to the real skirt, but it clearly shows the unusual shape of the skirt panels. 


I must have been feeling brave when I picked out fabric to compliment the dupatta, because I chose to use a pale gold silk charmeuse!  I was absolutely seduced by its rich, soft, slippery silkiness.  Problem is, there's a big learning curve when sewing such a finicky fabric.  I scoured my books and the internet for tips and practiced stitching on lots of scraps before I was brave enough to attempt the skirt.  

I ended up hand basting my seams first, used a fresh super sharp thin needle and set my stitch length to slightly shorter than normal and sewed slowly and carefully.  It was frustrating and I still got some slight puckering on some seams, but all in all I'd call the experience a win :)


Before hemming to length

I'll have to apologize, because I don't seem to have a single picture of the draping, patterning, fitting or stitching of the bodice.  I also don't remember much about the process, because this dress was made back March/April!  You'll have to settle for this- I draped a short waisted bodice with a generously curved bustline.  I used some coutil scraps as an interlining to give it some support, and also boned the heck out of it.  I joined it to the skirt messily (oh noes, exposed seams!) because I planned to cover the join with a waistband.  Inside I added a waist stay to take the strain off the rest of the gown; this helped ensure that the bodice wouldn't be pulled down by the weight of the skirt (snagged that idea from this Diary of a Mantua Maker post).  In any case, here's what I ended up with-


Oh hai va voomy curves!  It's certainly no Camille Clifford, but it was a bit curvier than I'd expected, especially as many teens dresses are somewhat less shapely.  At this point the gown shape was looking as though it belonged to a slightly earlier era, but I knew that the overlay would tone it down enough.  

There was a horrible horizontal wrinkle just under the waistline that was likely caused by the fact that the boning in the bodice stopped at the waist.  I should have let the boning continue a few inches into the skirt, but since that was all going to be covered up anyways I wasn't too worried!

The border you see along the top of the bodice was a scrap of beautiful tambour embroidery work rescued from a sari that was too damaged for anything else.  While my piece was relatively intact, the weight of the heavy metal embroidery was already threatening to tear the delicate sari fabric into shreds.  I had to stitch around every motif to attach it to the dress in a way that would support the whole thing.  

Oooooh, sparkly!

With the base gown done I started to play around with draping the dupatta over it to see how to best display the beautiful embroidery.


Once I settled on a version I liked I tacked the fabric down around the waist, cut the upper section free and mucked around with it some more until I had passable gauzy oversleeves.  I didn't end up with quite enough fabric to cover the back, but I didn't mind too much.  I added a sash of bronze silk taffeta and called it good!


All my photos from PEERS Titanic Ball are fuzzy, but I ended up wearing this again to Gaskells with several other lovely ladies sporting 1912 styles.  Of course we all had to pose for more pictures! 

Photo courtesy of the lovely American Duchess

Silver and gold sparkly ladies! ( and a bit o'goofiness)
Photo courtesy of the lovely American Duchess
It was fabulous to see so many great gowns and chat about the trials and travails of tacking a new time period.  The dress was perfect on the dance floor and the tiny train only got slightly trod on.  During the second break I escaped the dance floor and took off the ill-fitting corset and discovered that the dress fit fine without it, thought it was a bit tight in the waist. All in all I'd call the project a success, and I'm looking forward to exploring the era a bit more (especially as I scored a darling teens day dress off of ebay that I'd love to recreate!).

August 24, 2012

Titanic Gown Teaser

I'd intended to have a post about my Titanic gown done today, but time got away from me and I'm still writing it!  I'll have it up tomorrow, but in the meantime here's a teaser shot of one of my favorite parts of the gown.


Until tomorrow!

August 22, 2012

Teens Corset (for reals this time)

Accidentally hit "publish" instead of "save" yesterday while writing this, so sorry to y'all who may have briefly seen it half done!  Anyways, here goes, for real this time.


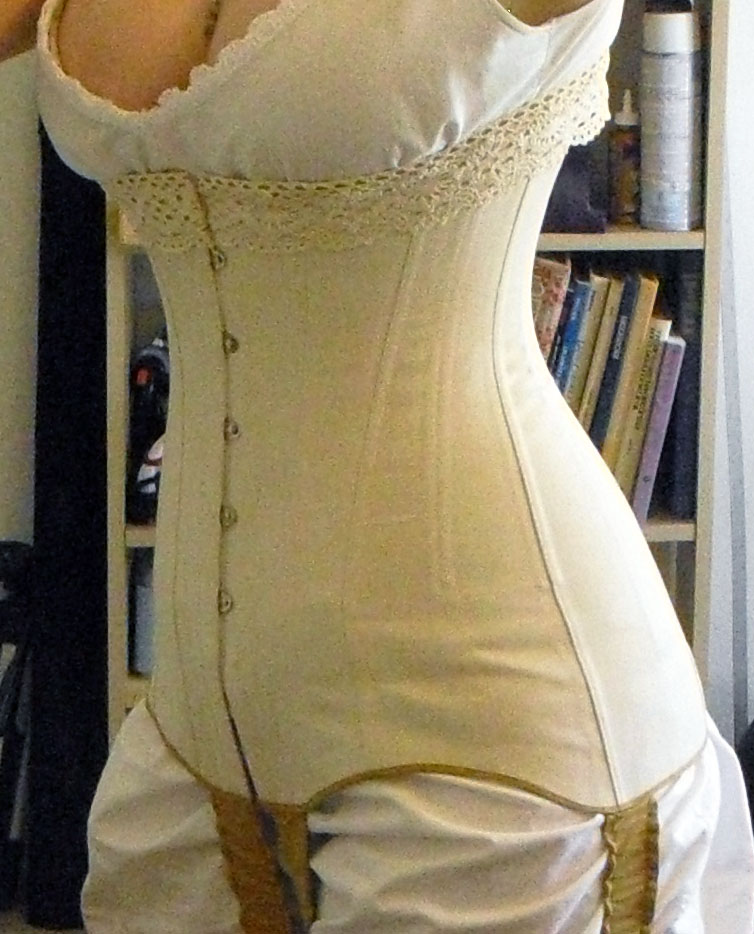
Yesterday's post reminds me that there are lots of things I still haven't gotten around to showing you, so this week will be all about catching up.  Remember those saris?  I did manage to knock out one Titanic dress from that stash, then got stalled halfway through a second one.  But before I show you the completed dress I should show you the corset I made to go under it!  I no longer own this corset; due to fitting issues I wore it twice then gave it away to Lauren, who says it fits perfectly.  I've cobbled the following together from photos and notes I took before I sent it on its merry way.  Despite the fitting issues, I learned a LOT from this one!

While I've made several corsets in modern and mid-Victorian styles, teens corsets were something I've never studied or attempted before.  Luckily, the fabulous Jo at Bridges on the Body started up a 1911 corset sew along!  Her posts cover every part of the process from beginning to end and made tackling this project much less scary.  Of course, despite my best intentions I didn't end up sewing along with everyone else at all; rather I got mine started just as everyone was finishing.

I chose to use the Post Edwardian Longline pattern she provided rather than the Corsets and Crinolines one.  I wanted this to be as easy as possible and didn't want to deal with the gussets on the latter.  I blew up the pattern and made a mockup (forgot to take photos of that apparently).  I found that while the waist seemed like it would be OK, my butt ended up super squished.  The corset was also too short and needed a touch more room in the top.  I raised the top one inch, added an inch to the upper back and two inches to the butt.

The pattern with my additions taped on

I was in a hurry so I decided to not make a new mock up to assess the changes.  If I had, I would have found that I still needed to add space in the mid hip.  I also needed to add a bit to the waist; even though it's the same width as other corsets I own it still doesn't fit right.  Since this style has the waistline sitting a bit higher than earlier corsets the tightest part is actually directly on my ribcage where I don't squish so well.  When I made the original mock up I thought the reason I couldn't close the waist further was because the hip area wasn't laced anywhere near closed.  I thought the problem would be solved by the addition of those two inches at the low hip.  Adding to the hips of other corsets I've made has allowed me to lace the waist tighter before (see Cathy Hay's discovery of the extra room effect), so it wasn't a completely stupid assumption.  Even so, I should know that when tackling a completely new style of corset one shouldn't assume that everything will work the same!

I made the corset out of cream coutil with a patterned quilter's cotton for the lining.  A mustardy organic cotton served as bias binding and covers the garter straps.  I had planned to use a matching twill tape for the waist tape but ended up skipping that part.  I also bought some golden Japanese embroidery thread with the intention of doing some flossing, but that didn't happen either!

Well at least I ended up using half this stuff

 Lazyness prompted me to use purchased casing for the boning channels.  I should know by know that laziness doesn't pay.  The casing can fit two bones side by side, but juuuuuust barely.  In order to get them perfect, I had to hand baste the channels exactly where they needed to go, then carefully stitch about 1/16 of an inch in from either edge.  Then I could remove the basting stitches and carefully stitch down the exact center.  I was a liiiiittle bit off on some and as a result it was difficult to shove the boning in, but I managed.


I screwed up when placing the grommets.  I like to punch a tiny hole where each grommet will go, but this time I got overzealous and didn't notice that part of the corset got folded underneath the rest while I was hammering away!

Whoops!

Luckily the damage is to the very top part of the corset.  It won't be taking much stress at all, and will be covered by lace.  Some quick stitching later, the holes were patched and the problem was solved.  I highly doubt that anyone would even notice it in the finished corset!

What?  It'll be covered up in the end.

This type of corset doesn't fasten all the way down the front; the busk ends several inches short of the bottom.  The bones end around the same point.  The two front halves can then open up when you sit or take long strides.  This design lets the corset be extra long to provide smooth shaping, but still allows you to move.  I loved the long line, but decided I wasn't a fan of the extra fabric over the front of my thighs, nor the super straight line of the bottom.  There's also some wrinkling in the lower third; that's because there aren't any garters to pull the edge downwards yet.


To pretty it up I carved out some curves just above each thigh.  I bound the edges with a thin bias tape made from the mustard cotton and added some pretty lace around the top.  I attached garters at the center front and sides, then clipped them to my stockings to pull the corset into alignment.  What a difference!


The back doesn't close as much as I wanted to, but that's what I get for not making a second mockup.  You can see that there's a flat spot in the back mid hip where there isn't enough space in the corset and it just smooshes my butt down.  The corset isn't laced all the way down because I ran out of silver 00 grommets and had to leave off the last two on one side. 

The poor corset just can't handle
all that junk in the trunk!

Even better, I can sit it it!

Look at how well it maintains that smooth line
all the way down the back!

The busk is shorter than the corset so that it doesn't
poke, and the bottom front edges split open.

It certainly gives me the proper shape, and visually it appears to fit well enough.  It also encourages the wearer to lean forward ever so slightly, adding to the proper fashionable silhouette.  When I first wore it out I thought it was pretty comfortable for the first hour.  Unfortunately, after that first hour it became a nightmare to wear!  I'm not sure if it's just that the sizing is off, or it's the high placement of the waist that is problematic, or if the style of corset is just not my body's cup of tea.  I think that the constant urge to lean a bit forward caused some of the issues.  In any case, I learned a lot from this adventure, and the corset is happy in its new home.  Everybody wins!

March 2, 2012

So Much Pretty

Whoops, got sucked down a rabbit hole for a few months.  Between Dickens, a work promotion and life in general I've been busy.  Last week was the first time in two months that I stepped into my sewing room to do anything other than find a missing costume piece!

Even so, I've got plenty of stuff to show you over the next few weeks.  Today isn't for showing things I've sewn though.  Instead, I'll be showing you the results of my latest addiction.  In the wee hours of the morning, when I'm exhausted from work and want nothing more than to just sit and look at pretty things, I've been lurking on eBay buying these-

Above: far more saris and dupattas than I really need.

That's not all of them; there are two more on the way, plus some sari borders that I bought to use as trim.  My excuse was that I'll use these to make Titanic dresses, but really I'll probably only do two or three.  I started buying them after I saw the beautiful dupatta that Diary of a Mantua Maker is using for one of her dresses; later I saw that several people on The Unsinkables Facebook group were buying saris to make gowns as well.  (If you're planning to make a Titanic-style gown, the members of The Unsinkables have been posting all sorts of wonderful things that will help you)  Once I got started buying them it was hard to stop!

I've got some ideas for a few of the extras, but maybe readers could suggest projects for them as well?  Note that the saris tend to be about 5 yards in length and 1 one yard in width, with about a yard of one end heavily decorated.  The dupattas (a type of veil) are roughly 90 inches by 45 inches, with some being smaller or larger.  Unlike a sari, if the end of a dupatta has a fancy border, that border is mirrored on the other side. 

 Bright yellow with over the top green, pink, and cream embroidery with bead work!

This yellow sari is begging to be made into an open-fronted Regency over robe.  I probably won't get around to it until summer, but I WILL make it.

 Teal net with exquisite goldwork embroidery.

This teal net sari with goldwork will definitely be made into a 1912 gown.   I'll be rummaging around Stone Mountain and Daughter this weekend to find suitable fabrics to go with it. 

Self destructive dupatta!

This red dupatta is one of the first I bought.  I've been planning to use it for a 1912 dress, especially as I've got the perfect trim for the top of the gown (I'll have to show you later, as I don't have a photo of it just now).  However, the sequins and goldwork on it tend to snag the delicate fabric, and while I love bright red it just isn't floating my boat the way it did at first. 

Love.  Love.  Love.  Don't know why, cause I'm not generally an orange fan.

When this light orange beauty showed up in the mail, it immediately stole my heart.  The tambour embroidery is just so pretty, and the pearly beads are the perfect understated accent.  It's a lovely drapey chiffon-like silk and the color is gorgeous.  The only thing I'm not a fan of is the fringe, but I can deal.  This is seriously vying with the red one  to be made into a 1912 gown.  I'd do a cream silk charmeuse under gown, with rusty accent details.  I don't have the perfect trim for the top of this one though, so I'll have to be on the lookout for some.


I don't have a plan for this one yet, but the fabric is gorgeous!  It's a thin, ever-so-slightly crisp silk with a pattern of squares all over.  The pallu (that's the highly decorated end of the sari that is often worn slung over the shoulder and hanging down in back) is beaded in a simple no-frills style.  With five yards to play with (one yard of which is beaded) there's lots that I could do.  But what to pick?

 Super stiff, but still pretty

I'll admit I was slightly disappointed with this one.  The listing said it was made of "tissue silk" and the photo showed an open weave fabric, which led me to assume it was lightweight and drapey (I know, never assume) I didn't see the part that said it was a little stiff.  It's almost like a super heavily starched net, and not at all appropriate for a flowy 1912 gown.  I'm not a huge fan of purple either, so I'm not sure what this is destined to become.  Any ideas?

I am apparently easily entranced by sparkly things.

Wowza!  No idea what to do with this bright orange dupatta with insane amounts of gold sequins and embroidery.  I bought it because SHINY.  That's a perfectly acceptable reason, right?

Why fringe?  Why?

More exquisite embroidery on this gauzy light green veil, and more icky fringe.  This looks like a sibling to the light orange one further up.  Not sure what to do with it.


I adore this rust colored dupatta!  It's soft and gauzy, and it's covered in tons of metal embroidery!  Those flowers are almost entirely made of copper, silver and gold; the veil also has bead work, regular embroidery, and sequins.  I was trying to come up with a 1912 dress design to use this in, but nothing is coming to mind.  I'll settle for drooling over it for now.


 Pretty floral embroidery on a green fading to light green dupatta.  I had some ideas for a 1912 gown for this, but I've already got my top three choices for my Titanic gowns and this one didn't make the cut.  What should it be?

Recycle, reuse and all that jazz.

Last but not least, trim!  These are from saris that were too damaged to sell; the usable border is cut off and sold as trim.  The blue one will likely end up as some sort of headband thingy for the teal 1912 gown, but I'm not sure what I'll use the others for.  The best sari trim I got isn't pictured, but it is fabulous and I can't wait to put it on a dress. 

Since these are all used, they have a particular "old thrift store" smell.  They really need cleaning, but how does one clean gauzy silk that's been embellished with strands of metal, beads and sequins?  Tomorrow I'll show you how I got the funk out of these delicate fabrics!