Showing posts with label Lattice Gown. Show all posts

May 3, 2015

Lattice Gown Revisited

Remember this old thing?

After 6 years (and a lot of butter, bread and cookies) the bodice to the Lattice Gown doesn't quite fit anymore.  I have a little bit of each of the original fabrics squirreled away, and with very careful design and perhaps some piecing, it might be possible to make a new one. 


Question is, what should the new bodice look like?  Should the lattice design from the skirt be echoed in the top?  Where, and how?  Should it include the evil gauze of evil? 

The fashion plate I based my skirt on.

The original fashion plate that inspired my skirt (above) has the latticework across the bertha of the bodice.  It didn't strike me as something I liked at the time, but now... maybe?

October fashions, 1837 France,
Journal des Dames et des Modes

I found this green dress while researching for my Romantic Era Gown.  I like the idea of a relatively simple lattice front, though the sleeves are too early era for my elliptically-shaped skirt.


I might split the difference between the green romantic dress and this one.  I'm not digging the tassels, but the shape and design is well within the right era, and I like the look of the lattice work.

September 2, 2013

Sewing Room Bliss

Almost like it was made to be right there.

I need to buckle down and complete multiple sets of clothes with looming deadlines, but there's not going to be a stitch sewn the next two weeks because I'm moving.  Despite the stress that this somewhat rushed and unplanned move will bring, I'm super happy, because LOOK AT MY NEW SEWING ROOM!!!  LOOK AT IT!!!

The lattice dress was literally the first thing I moved in and set up, just so I could take this photo.  There's much more to the room, of course, but this view is what makes it for me.  I'll happily live out of boxes for weeks, because OMG MY SEWING ROOM IS AWESOME.

September 20, 2011

The Lattice Gown, Final Edition (Until I Decide to Make Lattice Gown 2.0)

Oh hai.  The Real World™ stole me for a bit, and "tomorrow" turned into next week.  Anyways...

When I left off the skirt was totally done and amazingly awesome, but the bodice... meh.   It was just a super basic bodice; no sleeves, no bertha or any trim and ill-fitted to boot.  While I plan to make a completely new bodice in the future, I decided to get another wearing out of this one by finishing it off and correcting what bits I could.  Again, I didn't take many pictures of the process, but hang around till the end and I'll show you lots of the finished dress!

First up- sleeves.  Although I used Simplicity 5724 as a base for my bodice, I find the sleeves on the pattern to be almost comically ginormous (although that could be a result of my fabric choices the one time I used it).  Judge for yourself-

I'm pretty sure that enormous sleeve has devoured my upper arm and is making plans to snack on my elbow.

I like them for some things, but for this dress I wanted a smaller, more delicate sleeve.  I opted to use the sleeve pattern from Truly Victorian 442.  Unfortunately I don't recall if I used it as-is or added some fullness.  I used the evil silk gauze of evil, but since these were just two small sleeves I didn't mind that I had to hand sew them (and pin the everloving s**t out of them, and deal with the fabric deciding to shift and veer off in unpredictable directions, and washing my hands every two seconds, and... yeah, ok it was still annoying as all hell).  Since you can see through the gauze I used French seams so that no raw edges showed.  I decided to bind the top and bottom edges of the sleeves with skinny bias tape made of the cream silk used in the skirt for the same reason.  The sleeves were fully finished on all seams/edges/what-have-you before I attached them so that they can easily be taken on an off at will.  I whipstitched them to the bodice at the top and sides of the armscye, leaving the bottom open.  I wasn't sure what the range of movement would be with these sleeves, and since they are made of such a delicate fabric I figured leaving the bottom unattached would allow me to raise my arms without the possibility of ripping them.  I'm quite a fan of how the sleeves turned out and will probably take them off of this bodice and sew them to bodice 2.0 when it is made. 

 French seams, handsewn bias edging, and the bottom portion of the sleeve left detached from the bodice.

Fresh from a fairly successful experience sewing the evil gauze, I started on the bertha with high hopes for fairly painless success.  That quickly devolved into growling and cursing.  I wanted the softer look of the gauze for this part, rather than the crispness of the taffeta or dupioni.  Initially I  wanted to make a pleated bertha, perhaps with the cream dupioni to back it, but with this gauze?  No friggin' dice.  After much fussing and pulling of hair (figuratively speaking of course; I had a buzz cut at the time) I just took a length of the stuff, pinched and tacked it to the bodice at CF and the shoulders and let it fall loosely in between the tacks. 

I couldn't quite figure out what to do with the excess in the back.  I tried a few things, then ended up tacking it a few inches shy of the CB and letting it fall freely from there.  The ends aren't finished or anything; I figure if they fray too much I'll trim them between wearings. 

To finish off the trimming I tacked the two roses I'd saved from earlier on at the shoulder.  To see how these roses were made, go here.

I still cannot get over these roses.  LOVE THEM.

As mentioned previously, the bodice was in serious need of some padding on top.  Each bust pad in the Simplicity pattern is made with three stacked layers of batting; each layer is cut in a sort of teardrop shape and each one is smaller than the previous one so that the pad is thicker in the middle and thinner on the edges.  I wasn't able to use the original pattern as is b/c I'd modified the neckline too much.  Cutting the pads down on top didn't quite work either; for some reason they just didn't set right.  I ended up making custom pads.  I started by laying down a single layer of batting across the whole bust to give a smooth line.  I "feathered" the bottom edge of this by gently pulling the batting apart so that there wasn't an obvious ridge where it ended.  I then cut a small oval to fit in the pointiest part of the bust, then a slightly larger oval, etc etc.  The shape of each piece changed slightly to accommodate the shape of the area it covered.  As I added each layer, I loosely tacked it to the previous one.  Periodically I held the bodice up to my body to see if there were any spots that needed more padding.  When I'd added enough to fill out the bodice adequately I cut a scrap piece of lining to cover the whole mess and carefully stitched it down around the edges.  

And more padding, and more padding...

I could have ripped open the side seams and let the waist out some, but I didn't care enough about the gap in the back to go through all of that, so I called it done.  On with the finished pictures then!

You can see the sleeve quite nicely here.  You can also see that I forgot to understitch the lining at the bottom of the bodice so that it wouldn't creep out and be visible.  Ah well, next time I'll likely pipe it as I usually do.


So far I've worn it out to dance twice, but currently I've got it packed away waiting for some awesome event to pop up that requires an over the top dress.  Any suggestions?

September 12, 2011

You'd Think I Could Manage to Not Screw Up a Simple Bodice...

Where was I before I got completely distracted by vintage sewing machines?  Oh, right.


Unfortunately, I'd spent too much time on the skirt and now had only one evening to make the bodice before the ball (I debuted this at the February 2011 Gaskells).  Since I didn't want to attend nekkid from the waist up I quickly threw together a basic bodice with the intention of fixing it up later.  As often happens, too little time = errors and unfinished bits.  I did end up adding to it for its second wearing, but I'll probably scrap it and make a completely new bodice one of these days.  For now, I'll show you what I put together for that first night out, complete with a few crappy iPhone photos b/c I was in too much of a hurry to find my camera or take pictures.

To save time I decided to use Simplicity's ballgown bodice pattern (#5724, out of print).  I've used it a few times before; usually all I have to do is take in the waist a little.  Of course, I've never bothered to mark the pattern with the changes I make, so every damn time I have to do a quick mock up to adjust it.  While I'm generally a huge fan of the deep front point in this pattern, I chose to cut it down to a much more shallow one to avoid competing with the points of the overskirt.  I always lower the neckline of this pattern a bit, but in this mock up I overdid it and had to make a note to pull it back up an inch when cutting out the real thing.  Nothing says classy like falling out of your bodice gals!

 Oh hi.

I went about constructing the bodice differently than I usually do.  I wanted a fairly lightweight bodice with no canvas interfacings, and I didn't want any raw seams showing.  I cut sets of all the bodice pieces out of the green silk dupioni, the silk organza, some cotton organdy and a pretty vine patterned quilter's cotton for lining.  I flatlined each piece of green silk with the silk organza, and each piece of quilter's cotton with the cotton organdy.  I sewed all the flatlined pieces of silk together to form one layer of the bodice, then did the same with the cotton pieces.  Now I had an inner shell of cotton and a separate outer shell of silk.  I sewed my bone casings on the cotton shell and used spiral steel bones to fill them. 

  
The pretty quilter's cotton I used for a lining.

I chose to do something odd to join the inner and outer shells.  Very often, one sees a lot of wrinkling 'round the waist and ribs of tightly fitted ballgown bodices.  I thought about a technique I'd learned for making corsets from the Corsetmaker's forum on Livejournal in which a little extra room is given to the fashion fabric layer, usually through roll pinning.  In part it accounts for the extra distance the outer fabric has to travel compared to the inner fabric as they bend back on themselves at a seam, but also for the extra distance the outer fabric has to travel around the body itself.  Since I just reread what I wrote and realized it doesn't make a whole lot of sense, here's some terribly drawn pictures.

  
The fashion fabric has farther to travel, both at a seam (above) and around the body (below)

Imagine looking down at a cross section of your torso wearing a corset or bodice with an inner layer and an outer layer.  The inner layer only has to go around your body.  The outer layer has to go around your body and the inner layer.  It doesn't seem like much, but it adds up!

If the fashion layer is the exact same size as the lining, it ends up straining to go that extra distance and you get stress wrinkles.  I'd already sewn my outer pieces together, so I wasn't going to be able to account for turn of cloth at those seams, but I hadn't yet sewn the inner shell to the outer shell yet.  I pinned the inner shell on my dummy with the right side facing out.  Then I put on the outer shell, right side facing in.  I matched it to the inner one at the center front, then smoothed it till it lay nicely all the way around the dummy.  When I got around to the back, I could see that the fashion layer was nearly 3/8" shorter on each side.  That means the outer layer needs to be nearly 3/4" larger than the inner layer in order for it to lay smoothly around the body with no pulling! 


That's quite a difference! (Ignore the weird fit on the not-yet-uniquely-me, I haven't gotten around to loping off the excess in the shoulder area and it makes everything funky)

I figured I could lose 3/4" off the back and just make a placket to fill the gap, so I pinned the two layers together at the back edges and trimmed off the excess lining.  I sewed the layers together down the back edges and all around the bottom, then clipped seams and turned it all right side out.  I put two boning channels with room for grommets between them along each back edge.  I sewed the shoulder straps together, then bound the neckline and armscyes with thin strips of self bias.


Twee little strips of self bias.


In my rush to fit the mock up, I had somehow managed to take the waist in too much.  Unfortunately, I didn't notice till I was assembling the final pieces on the dummy.  Between that and the 3/4" I took out as a result of my little experiment, I had a larger gap at my lower back than I'd planned.  I had also run out of time.  I had hoped to be able to slap a bertha or sleeves on before the ball, but I had to go without those or any trimmings. 

Looks so plain!

I also ran out of time to recut the bust pads that go with this pattern.  Victorian bodices are meant to be wide on the top so that the waist looks smaller in comparison; oftentimes that meant padding for women who were less than well endowed.  This pattern includes giant pads and is cut with extra room in the bust to assist that tiny waist illusion.  I had a set of pads made up from the last time I made this bodice, but I lowered the neckline so much on this one that they stuck right up out the top.  Sexy, no?  With no time left I wore the bodice as is.  While it fit perfectly smoothly at the waist and lower ribs, the bust looked wrinkly and unflattering. 

Lovely photo by Anthony Argyriou
Pretty skirt, meh top.

Thankfully, the skirt was a huge hit and drew most of the attention away from the bodice!  I had a blast dancing at Gaskells and managed to not dirty up/rip/spill anything on my lovely gown.  I did have a moment of alarm when the lattice snagged on the button of a passing gentleman's jacket mid-dance, but once freed I was thrilled to see that it hadn't harmed it one bit.  Yay for heat'n'bond I guess?  Anyways, check back tomorrow to see the changes I made to make the bodice less crappy.

August 26, 2011

Roses!


I'd seen a few "how to make fabric roses" tutorials here and there on teh interwebs and thought that it looked fairly easy. Turns out it takes quite a bit of skill (and luck) to make a pretty rose! My first attempts looked like lumpy wadded up bits of scrap fabric. I tried a couple of different methods and some different fabrics and pretty much failed at them all. Sadly, I can't find the photos I took of those first horribly ugly attempts, otherwise I'd post them in all their terrible glory.


Dramatic reenactment of first attempt.


But bit by bit I figured out which things worked. I ended up combining things from a few tutorials and finally came up with a passable rose! I'll try my best to show what I did, but be forewarned that while it seems simple, doing it well involves fiddling and practicing till you find what works for you and your fabric.

Back when I dyed the bottom ruffle I also tossed in some extra silk gauze and some silk organza so I could play with both and see which worked best. My original plan was to use the gauze as I thought it might make beautifully soft roses, but it turned out it looked terrible no matter what I did! I'd guess it's too soft and flimsy to hold a good shape, although it might be fun to try doing it again using a stiffer fabric to support the gauze. That might be a good way to get pretty two-toned roses actually...

Anyways, I quickly figured out that the organza was going to work best. I cut a strip about 3" wide and 27" long and pressed it in half lengthwise. Then I turned the edges inside to meet the fold and pressed again. Basically I made double-fold bias tape, except it hadn't been cut on the bias.


Non-bias bias tape. The raw edges are all inside the fold.


I folded one end down a bit, rolled it in some to create a point at the top, then wound the strip around the folded/ rolled part a time or two to create the start of a bud. I pinched it at the bottom and sewed a couple of stitches through all the layers at the base to hold it all together.


One end folded over

The fold was rolled inwards; making it tighter at the top and looser at the bottom
gives it a conical shape with a nice point at the end. This is the beginning of the bud.

A loose wrap around or two...

... and stitch the bottom to keep it all secure


Here's where it gets a little tricky- from here on out you continue to wrap the strip loosely around your bud, but every so often you "twist" it; that is, you fold it outwards and continue wrapping. The edge that was on the top will now be on the bottom and there will be a twist that resembles the slightly curled edge of a petal. There's no rhyme or reason to when you do this; you just make those folds whenever they seem appropriate.  I also varied how loosely/tightly I wrapped it. Every so often you should pause and sew a few stitches in the bottom to keep everything together.


In the process of making the first fold.

This is after a few more wraps and folds. I'm about ready to make another fold.

I've folded the strip outwards. The edge that was on top is now on the bottom...

...and continue wrapping.

Don't forget to stitch through all layers at the bottom after every few wraps!


Clear as mud? I tried to take a video of the process, but I can't for the life of me get my camera to focus on anything close up, so after six videos of a blurry reddish blob moving about I gave up. Anyways, finishing it off- when I'd wrapped and folded to the point that the rose was looking nice and full, I folded the strip once more, this time angling the whole strip towards the bottom instead of back around the flower again. I stitched it securely, cut off the unused portion of the strip and stitched everything some more just to be sure.


Ta-Da! This was my first successful rose!

Then I made more...

...and even MORE!


I needed one for every bottom juncture of the lattice plus a few for the bertha of the bodice. I put the prettiest ones aside for the bodice; I figured they'd be closer to eye level and I wanted them to look their best. For foliage I used pinking shears to cut leaf shapes out of the green silk. I lined up each bottom lattice juncture directly over the uppermost point of the ruffles, placed the leaves at the center of each juncture and stitched all the way through the skirt. Once that was secure I centered each rose on top of each set of leaves and stitched that down as well.


All that was left to do on the skirt was finish up the closures. I put a large hook and bar on the waistband and used hook and eye tape to join the back halves of the green pointed part of the overskirt. Done!

August 25, 2011

So. Gauze. Silk gauze, to be exact. Lighter than air, softer than a kiss and absolutely beautiful.

Also? A pain in the the ass.
Let me back up. Here's the inspiration image again-


Print from the fashion magazine "De Gracieuse", found at The Memory of the Netherlands.


From the beginning I had decided that I wasn't going to copy it exactly. I knew I wanted the top to be different somehow, and I knew I wasn't a huge fan of the bows at the bottom. I liked the idea of the fabric underlay beneath the lattice, though I wasn't a fan of the ruched look of said fabric. I also wanted to change the four pouffy rows of trim at the hem. I decided to replace them with rows of floaty of gauze ruffles following a scalloped line. I also wanted the bottommost tier to be a dark peachy rose and each successive tier to be lighter, until the topmost one was pale cream. I don't ask for much, do I?

Dharma Trading Co. sells beautiful 36" wide silk gauze for dirt cheap (or rather, they did; it was $1.60 a yard at the time, now it's nearly $3.00), so I bought a bolt . After testing various ways of sewing it, I decided that it is the most horrific stuff to sew ever. The sewing machine doesn't sew it, it just eats it.  Hungrily. You can't use a tear-away stabilizer to help, because the moment you try to tear it away it will just rip the silk. I suppose I could have tried water soluble stabilizer, but I either didn't think about it or had some reason I didn't want to use it at the time. A few years ago I had great success using my serger to do a super narrow rolled hem satin stitch on the edge of some poly chiffon ruffles, but several attempts to do the same on the silk bombed. I was at my wits end. I was NOT about to hand sew that much gauze. So how to hem yards and yards of this stuff?

Cheat.

I already had a ten yard bolt that had hardly cost anything; I could simply cut the edges off five inches deep down the entire bolt and use the very clean looking selvage as the "hem" of each ruffle. I ordered another bolt and between the two I had four lengths of silk, each ten yards long and perfectly finished along one edge. I planned to use the middle portion of each bolt to underlay the lattice, so it wasn't going to go to waste. Success! A very careful pass through the serger bound the upper edge messily, but enough to keep it from unraveling in the dye bath. One obstacle down, more to go!

I've dyed fabric before (generally by tossing it in the washing machine and praying) but I'd never had to hit such a specific and complicated color goal, nor tackled such delicate fabric. A previous costuming attempt to dye a much more robust silk had resulted in great color, but absolutely wrecked the fabric. Hot water is generally necessary for dyeing, but most silks don't like it so well. I found a cold water dye that purported to work on silk and seemed to be approximately the color I wanted, but swatch tests gave lackluster results. I scoured Dharma for appropriate dyes; the only ones I could come up with would require hot water. I ordered two anyways.


Between these and possibly a few drops of various other dyes in my stash I miraculously got what I wanted


I wish I could recall what I did to get my final results. Honestly, it was all a blur of test swatches, emptying and refilling my giant dye pot, mixing, remixing and mixing some more. By the end of it, my hands, my sink and my counters were various shades of reddish bronze and I had this-


The top two are already dry and pressed;
the bottom three are still wet and therefore not their final colors yet.


The middle fabric in there is some silk organza I threw in on the off chance that it would be useful later. I'm glad I did that, because it turned out to be perfect for making fabric roses.


Dried, pressed and waiting to be ruffled


The only problem is that I ended up needing to heat the water to set the dye, so the gauze ended up with a bit of a crepe-like texture that I wasn't super thrilled about. OTOH, it's going around the hem; if anyone wants to get down on their hands and knees to critique the texture of the fabric I'll stomp 'em.  Or possibly let my ginormous hoopskirt eat them and spit out their bones, whichever pleases me most at that moment.  The gauze is still soft and super floaty so it serves its purpose.

I ran gathering stitches along the top edges of each length of gauze and began sewing them to the skirt. I lightly drew a chalk line where I wanted each tier, pinned each ruffle upside down along that line, stitched about 1/4" in from the edge then let the ruffle fall down to hang over the stitches I'd just made. The bottom ruffle runs straight around the base, while the remaining three follow a scalloping pattern so that they reveal more of the dark base ruffle where they swoop upwards. The peak of each scallop falls directly below the bottom juncture of each lattice strip.


Three of the four ruffle tiers


All four of the finished ruffles. (I tried to edit this pic to get rid of
the yellow, but then it kept loading sideways. Damn computers.)


After the ruffles were on I trimmed and neatly finished the bottom edges of the lattice strips.  I thought long and hard about doing the gauze underlay I'd planned.  Ok, I really only thought about it for a few seconds and then said HELL NO.  The gauze was too much of a pain in the ass to use and the silk strips were so difficult to sew through.  Besides, the cream silk of the skirt has such a pretty luster that it would be a tragedy to cover it. That decision made, there were just a few things left to do on the skirt at this point- closures, a placket and some roses to replace the bows in the inspiration image. So next up, handmade fabric roses!


August 22, 2011

The Lattice Gown, Part 1

Past time to start one of these, so here goes nothing!

Here's a gown I made over the course of a month this last spring. It is possibly the single most complicated and awesome thing I have ever sew, hands down. Before I completely forget how I went about making this, I figured I'd do a few posts on it. Since this project was a few months ago I'll apologize in advance if there's things I end up leaving out by accident!


I've been calling this the lattice gown. Others have called it the pie dress, the ice cream sundae dress or the pineapple dress (one of these days I'm totally remaking this in greens, golds and browns, AND with fabric made of pineapples!). Anyways, this is the image that inspired it-


Print from the fashion magazine De Gracieuse, found at The Memory of the Netherdands.

First off, I decided I wanted my hoop to be bigger. Now my hoop is already nearly 150" as is, but I figured that this dress was already a crazy endeavor so I might as well go whole hog and make it as absurdly over the top as possible. I made a simple petticoat of three or four panels of fabric gathered at the waist, with two deep flounces made of yards and yards of stiff netting.


MOAR POOF

That done, I turned to materials. The dress reminds me of an upside down flower; the bodice makes up the stem/leaves, the little peplum-ish thing at the top of the skirt looks like those little green bits at the base of a flower (called the sepal apparently) while the rest of the skirt resembles the petals of some exotic bloom. In keeping with the flower concept I decided my color scheme would be green, cream and rose. I really had my heart set on a nice dusky rose. But since I really wanted to do the entire gown in silk (going whole hog here, remember), I had to settle for what Triad had on hand when I went shopping. Thus I ended up with two yards of light green silk dupioni, five of cream silk dupioni and three of a peach/gold changeable silk taffeta. I also ordered a ton of silk gauze from Dharma Trading Co; that gauze is a whole freakin' post on its own, believe me.

Unfortunately, when I was at the store I had badly underestimated how much of the cream I'd need. I have NO IDEA how I thought I was going to get away with so little fabric, especially considering that I'd super-sized my hoop. Really, I know better. I just had a stupid moment. Reluctantly, I decided to go ahead and make the skirt as large as possible with what I had and see how it looked. I cut the cream fabric into three equal sections, then sewed them together selvage edge to selvage edge to form a large ring of fabric, leaving an 8" opening at the top of one seam so I could get in and out of the skirt. I decided to use tiny knife pleats to get all that fabric into the waistband. I knew the tiny pleats would just be hidden under the overskirt, but they please me so.


Twee little knife pleats. They reverse direction at CF and CB.

I eyeballed each pleat, pinned the everloving snot out of it all and ran a basting stitch across the top. Then I stuck it on my dressform to see how it looked. It managed to barely fit over the gianormous hoop, squishing the poofiness around the bottom of the petticoat down so much that the overall shape was greatly changed. Normally I wouldn't be ok with this, but I didn't have time or money to get more of the cream silk and the bottom was going to be covered with other stuff anyway. It's still crazy poofy, just not epically so anymore.
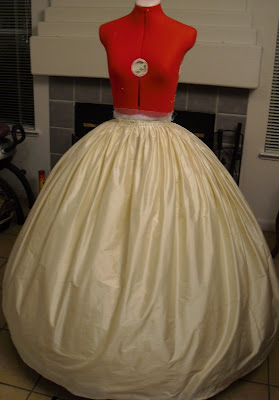

The only photographic evidence. It actually didn't look quite so horrible in person.
Plus it's unhemmed here, so it looks a bit odd 'round the bottom, what with the fabric sloping back in.

At this point I'd usually sew a waistband on, but I wanted the under and overskirts to be attached to the same waistband, so I started to figure out the bit that looks like the sepal on a flower (sepals? whatever). I decided to have twelve "points". My hoops are elliptical (they're a highly bastardized version of Simplicity 9764) so the points would have to be longer at the back to look right. I ended up using lengths of yarn to divide the skirt into equal sections, then draping a mock up of each individual point.


This was a stupid way to do this BTW.

It wasn't the brightest way to go about it. Were I to do it over (and I will. PINEAPPLE DRESS FTW!), I'd drape a short little fitted skirt, divide it into sections, draw the points on then cut it up and use it as the pattern. Either way, I ended up with six pattern pieces that fit around half of the skirt like so-


The green silk is flatlined to silk organza to give it some body. I put together the six pieces for the other side and sewed both sections together at the front (leaving the back open to get in and out of the skirt). I decided to line this with the same green silk in case the underneath showed while moving, so I cut and sewed together twelve more points, matched them up right sides in with the top layer and sewed all around the bottom edges.


I... I just don't know what happened here

I clipped the seams at the very end of the points, turned it all and used a knitting needle to poke out the ends. After pressing the bejesus out of it, I pinned it to the underskirt.


I popped a waistband on the sucker and moved on. I figured the lattice strips needed to be cut on the bias so they would gently curve over the roundness of the skirt. Luckily, I had a ton of cheap 1" wide single fold bias tape lying around, so I cut it into strips and got to work mocking up the woven lattice.


But first, a dance break.

What? I had just gotten my Uniquely You at that point. Oh fine then.


Starting to weave the lattice.

I pinned two bias strips to each point, then set about weaving them into each other prettily, pinning each juncture in place as I went around. While I wove I gently tugged each of the strips into a slight upward curve in order to get them to hug the shape of the skirt. And around and around and around I went, adjusting, repinning, adjusting some more, repinning, repeat. Once I was happy with the placement, I moved on to making the real lattice.

Using pinking shears I cut twenty-four 1 3/4" bias strips out of the peach/gold changeable silk taffeta, then sewed each of them up with an itty-bitty seam allowance. I didn't bother to turn them inside out; I just centered the seam at the back of each strip and pressed it open. I then gently stretched the strip along one edge to make it curve (yay bias!) and pressed some more to set the curve. Repeat twenty-three times. Resist urge to toss iron and strips across room.


The beginnings of insanity, right here

I pinned each of these in place over the mock lattice, weaving them under and over.


You cannot tell me that this right here doesn't remind you of a pineapple.

I carefully removed the guide strips, trimmed the top junctures of the lattice and tucked them under the points, then set about invisibly hand sewing each of those junctures.

BTW, did I mention there's over a hundred of those junctures? No? THERE'S OVER A HUNDRED OF THOSE FRICKEN JUNCTURES.

Ahem. What I mean to say is that I got a little frustrated by all the finicky hand sewing (and that silk was insanely difficult to poke a needle through) and busted out the heat n' bond. It seems like such a cop out considering the lengths I went through to make this thing, but there you have it. Half of those joins are basically glued together. I'm a little disappointed, but I can live with myself.


Let's just keep that whole glue thing between us, k?

I'll save the rest for future posts so as not to drone on forever! Tomorrow I'll switch it up and show you what I'm working on currently- a mash up of historical fashion and modern technology!