February 13, 2013

Repro Chonies Complete!

Original drawers on the left, reproduction on the right.

They're finally finished!  I've been working on reproducing a pair of antique drawers in my collection as exactly as possible, both for myself and to create a pattern to share.  As you can see from my post with lots o' closeups and analysis of these original antique late Victorian open crotch drawers, they're much more complicated than we generally consider utilitarian undergarments to be.  It's taken me a while to get the pattern and the repro just right, but now the drawers are done and there's just a few tweaks left to make on the pattern.  Conveniently, these also doubled as my project for the last Historical Sew Fortnightly "Under it All" challenge.
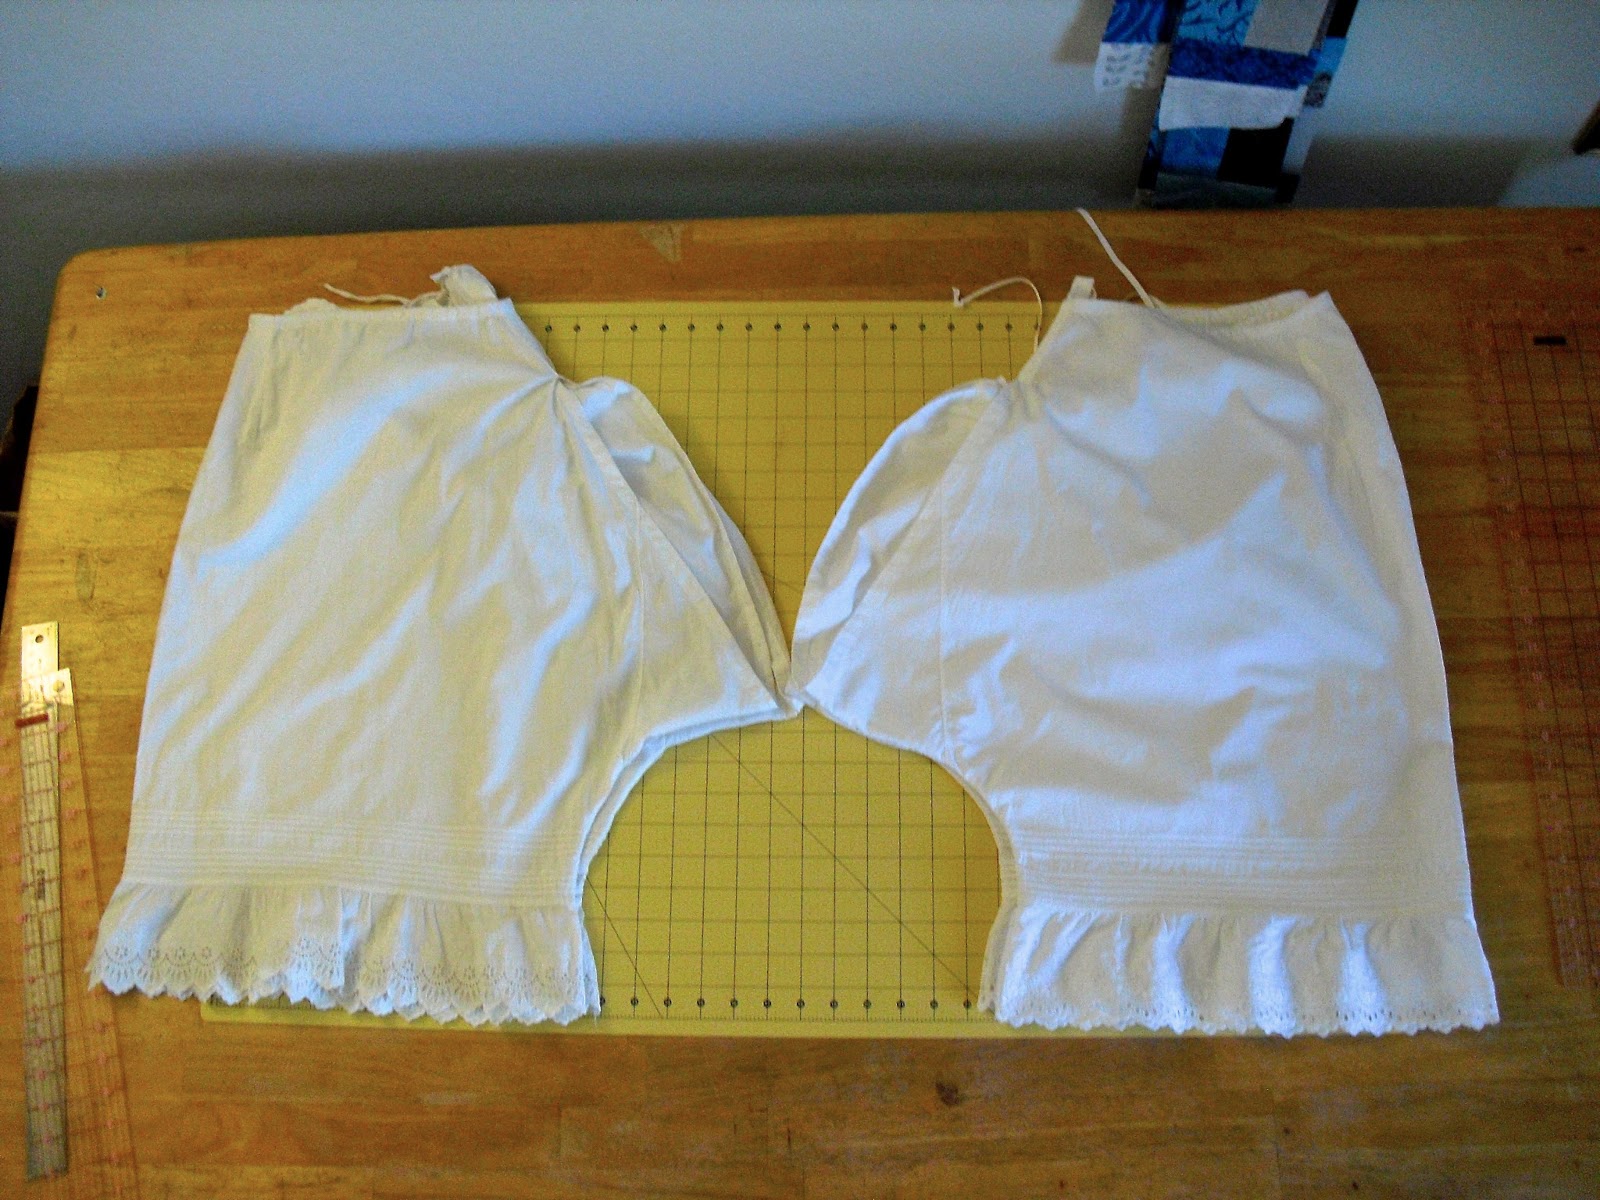
Originals on the left, repro on the right.

@#%^&$%! pintucks

The original pair boasted tiny 1/8" pintucks and ridiculous 1/8" flat felled and french seams.  Piecing, facings and darts galore were included.  The end result is a very sturdy pair of undies that can withstand repeated washings and abuse.

Repro lookin' awkward on a dummy with no legs

This is my second attempt at making a copy, and it went much better than the first.  It still took an insanely long time to complete all the tiny pintucks and seams (really, 1/8" felled seams, WTF?!?!), but the result is so nice!

Weirdest darts ever

There were some weird surprises along the way.  For example, a while back I noticed that these darts were topstitched, which isn't too strange.  What I didn't notice until this last weekend is that the topstitching is the only stitching in the darts.  In other words, the maker did not sew the darts first, press them to the side, and then topstitch them.  Instead, the maker folded the fabric into place as though the dart was already stitched and pressed and topstitched the whole thing in place in one go.  Weird, huh?

Just to confuse you, the antique is now on the right, and the repro on the left.
 
I was super pleased to find a vintage eyelet that was somewhat similar in design and quality to the original.  Modern eyelet just isn't anything like the antique and vintage stuff, not by a long shot.

Original on left, reproduction on the right

Wearing split crotch drawers is still something I'm on the fence about.  My first experience with them was, um, educational.  Beware sitting; if your modesty petticoat/chemise happens to get caught when you grab the back of your hoops to shift them out of the way to sit, you might get a cold, nasty surprise when your bare @ss hits the seat.

My repro in all its split crotch glory

While you can wear your chemise over this style of drawers or tucked under them, I'd recommend going with tucking the chemise in.  Not only would it help avoid the surprise cold seat mentioned above, but you avoid the problem of the long dangling ties in back...dangling...there.  Wrapping the strings around to the front wasn't a perfect solution, as they tended to shift around when I did that.  All in all, I'm more practiced at dealing with closed drawers worn a little low on the hip, so that's probably what I'll be wearing most often.  I'm still giving these a chance though!

Proof that the pattern has evolved since you last saw it.

I'm making a few minor correction to the pattern and finishing the instructions, but I should have it up within the next few days in all its gory detail.  It'll include all the tips and tricks I figured out for dealing with the crazy tiny seams, pintucks, piecing and other mad details inherent in these undies. 


The Challenge: #3 Under it All

Fabric:  Fine white cotton

Pattern:  Taken directly from an antique pair in my possession. 

Year: Late Victorian I'm guessing.  Drawers are hard to pin a date too.

Notions:  Vintage eyelet trim and a twill tape waistband.

How historically accurate is it?  Doesn't get much more accurate than this!  While nothing is going to be 100% accurate, this is really, really close.  It's an exact copy of an antique pair.  The original was sewn by machine, so machine sewing these is correct.  The eyelet is vintage, and is the same quality as the original, although not an exact replica of the design.  Every seam, dart and detail of the original drawers was pored over for hours to duplicate it exactly.  I do need a wider bit of twill tape for the waist tie, but I'll pick that up this week.

Hours to complete:  Oiy.  Forever.  I'm really not sure.  I've been examining and patterning off the antique for ages now.  Even calculating just the sewing time from start to finish is hard, because I paused to document each step in pictures and writing!  Taking all that out, probably 6 hours?

First worn:  Not worn yet!

Total cost:  Oh, I didn't keep track at all.  Not too much!

February 3, 2013

Mud, Trails and Corsets


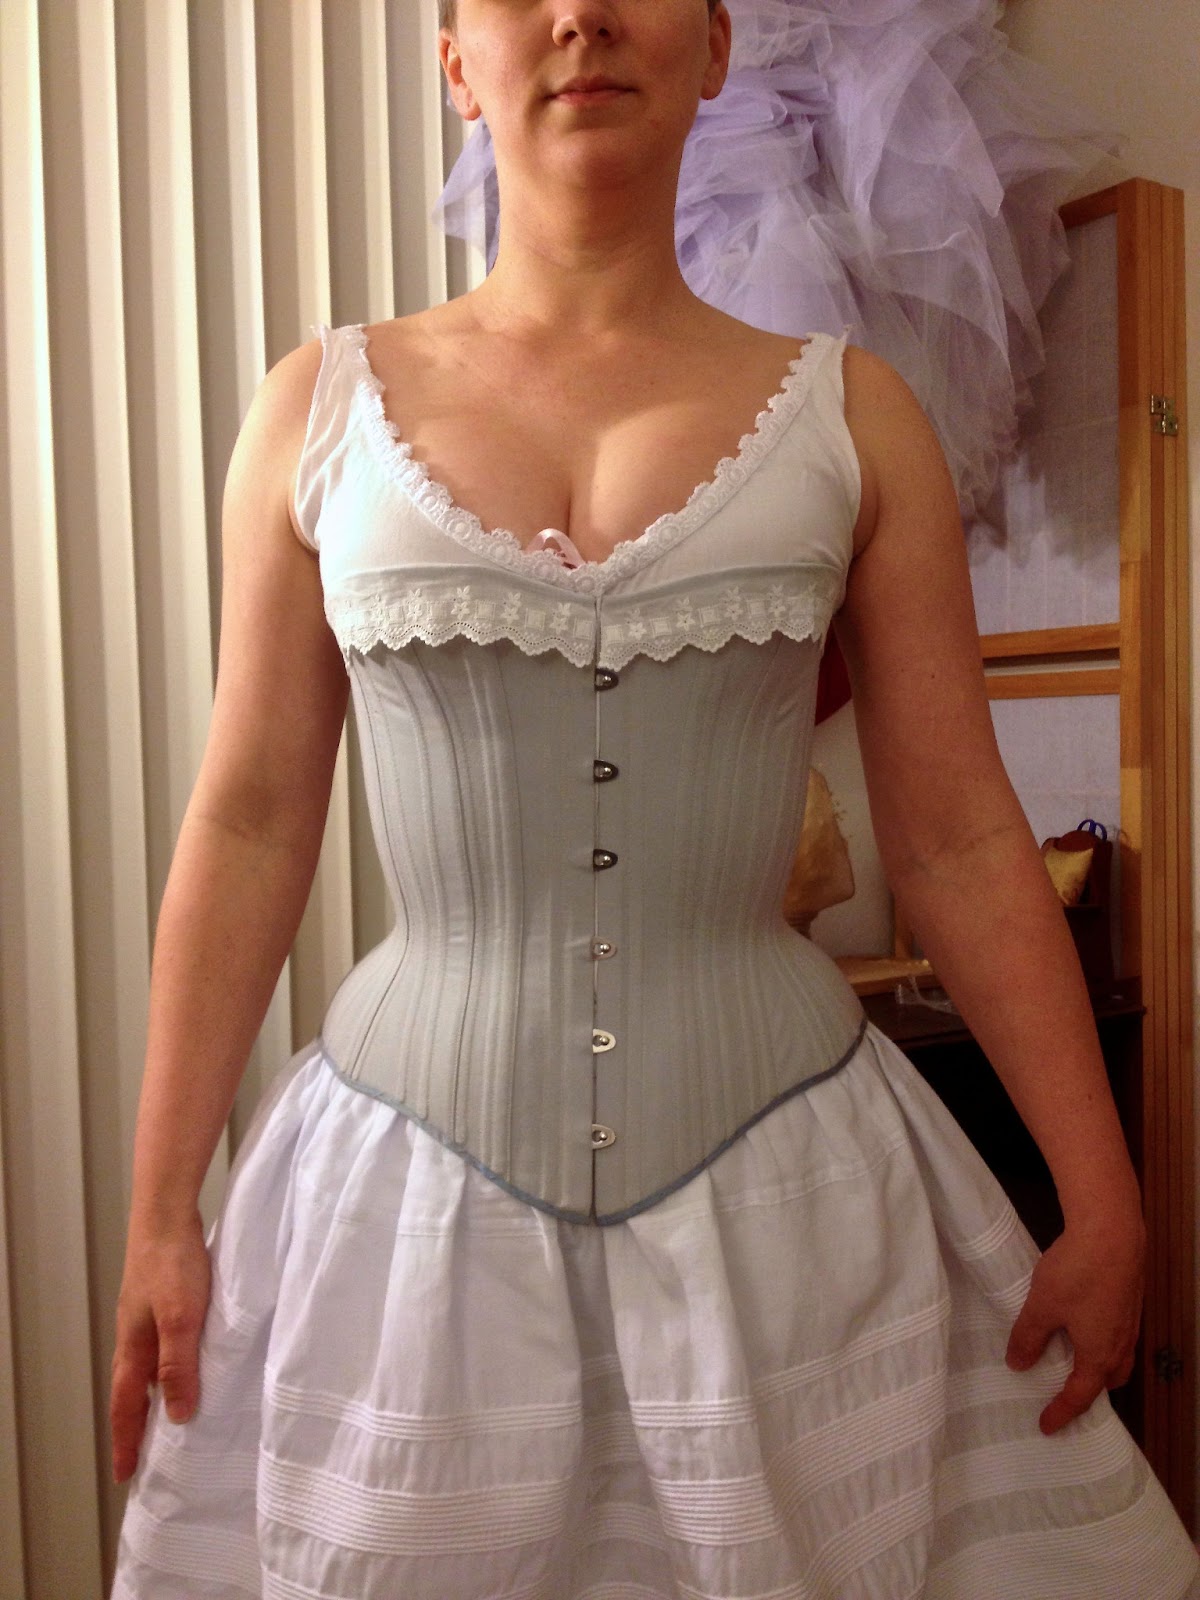
Hiking in corsets?  Why not!  My underclothes and I braved muddy trails, strange looks and a steep hill or two to get a few outdoor photos at our local Regional Park.  I'm happy to report that my white American Duchess Astorias survived the less than perfect terrain and still look brand new, and my corset is still crazy comfy even when scrambling down a rocky hillside. 


You can read about the making of the blue corset here, and how I made my corded petticoat here.  The drawers peeking from below the petti are my first attempt at reproducing these antique drawers; stay tuned later this week for the second, much improved repro and a pattern!


January 28, 2013

Blue Corset UFO Complete!


I started this corset last year and wore it all during Dickens Fair with no binding or trim because I never had time to complete it.  I didn't even have proper laces on it until Kathleen gave me some a week or two in!  Thanks to The Historical Sew Fortnightly UFO Challenge, I got this off of my pile of unfinished things.  Here's the belated rundown on how it went together.

I began by custom drafting a pattern to my measurements using this free tutorial from Foundations Revealed.  I heavily altered the draft by adding lots more space in the hip, plus some extra in the top back.  You've got to have some place for the squish to go!

Mock up time!

Being in a hurry, I only made one mock up.  Based on that I altered my pieces slightly, mostly removing width on one pattern piece and adding it to another, and smoothing the top line out.  Since I've completed this corset, I've changed the pattern yet again to correct some issues that became apparent in the finished product, but I'll point those out in a bit.


The completed corset was made with some super nice German coutil from Farthingales.  It's a bit pricey, but an absolute DREAM to work with!  The fabric is very thin and lightweight, but very tightly woven and strong (important in a coutil) with a very small herringbone weave.  It's quite stiff, which makes it pretty easy to work with while sewing, plus gives the corset itself great support.  After wearing it through the run of fair, it had molded itself to me perfectly.

Fun lining, courtesy of two quilter's fat quarters

While this stuff is probably strong enough to make a single layer corset out of, I chose to use two layers of coutil and sandwich the bones in-between.  Since I'm a fan of fun or pretty insides, I used some quilter's cotton with a nice pattern for a lining.  As with most of my corsets these days, I used a laser to cut both the coutil and the lining fabrics, because I am lazy as all get out when it comes to cutting.  The corset was sewn together mostly using the method described in volutelady's post about seams on the corsetmakers livejoural board.  I use all sorts of methods depending on the corset I'm making, but this one worked just fine for this project.

The bones on either side of the laces and right next to the busk are all white flat steels, while the rest of the corset is boned in spiral steels.  The flats keep the front and back stiff and sturdy, while the spirals allow for more pronounced curve at the hip and bust.  There are a grand total of 32 bones.

My moment of DUMB.

I was incredibly stupid while rushing through making this.  For accuracy's sake, I like to draw my seam line in.  However, rather than take the time to find one of the several fabric-friendly marking devices I own, I picked up the nearest ink pen and got to work.  My reasoning was that it would be on the inside and no one would see.  Of course, hours later my iron decided to spit up a bunch of water, soaking through the corset and wetting the ink.  Long story short, the ink bleed through to the outside, and I have been kicking myself since November.  Ladies and gents, learn from my example. 


Aaaaand now we're caught up to today.  Today was spent binding the top and bottom edges, and sewing on some vintage lace.  The binding is a lovely blue silk dupioni left over from another project, and the lace was a great find at Lacis.  I machine sewed the binding to the front, then handsewed it down along the inside.  My hands are killing me!  While the strength and tight weave of this coutil is a bonus for the structure of the corset, it is a total bitch to sew by hand.


It is at least some consolation that my skills at binding edges have greatly improved!  You can also see that I'm a big fan of thin bias binding.  The finished binding is only about 3/16" wide.


The lace was more of a pain to sew on than I'd thought.  At first I just whipstitched it on on from the wrong side and flipped it to the outside, but it looked odd, so I ripped it out.  To get it to look nice, I had to put the corset on my mannequin and carefully pin the lace in place around the curves, then tuck the excess to the inside and sew it.  But finally, at 7:00pm on January 28th, it was done in time for the challenge!  (I'm ignoring the fact that the lovely lady in charge of the challenge is in New Zealand, and that the day ended for her many hours ahead of me)


I've intentionally laced it looser at the back top to
avoid overspill.  The crookedness was not intentional,
and was later fixed by my dresser boyfriend

I need a little more space in the upper back, and the bit under the arm doesn't need to dip down so far.  I've since made these changes to the pattern, so the next one will be better.  I've also taken a bit of space out of the hip, because without a skirt to fill it in there's a little extra space there.   However, I quite like the dramatic hip flare, so I may make another in the future with the same hip width just for looks.


And now for the stats:

The Challenge: #2 UFO

Fabric:  Corset made from German coutil, binding from silk dupioni and the lace is vintage machine made cotton eyelet.

Pattern: Self drafted using tutorial from Foundations Revealed.

Year: eh, 1880's?  It's certainly a lateish Victorian corset, but it wasn't created to be a specific year or decade.

Notions:  8 white spring steel bones, 24 spiral steel bones, one busk and a bunch of two piece grommets, and laces supplied by the dear Kathleen.  I suppose the cotton eyelet could go in this category as well.
 

How historically accurate is it?  Pretty accurate, since we can't use whalebone and such these days.  I did draft it with a touch of extra space in the ribs, which may not be entirely period, but hey, most of us started corseting in our adult years rather than as girls!

Hours to complete:  Not sure on the corset itself, but finishing the binding and lace for this challenge probably took about 3 to 4 hours.  I meant it when I said that handsewing that stuff was the devil!

First worn:  In it's partially done state it was worn for the entire run of Dickens Fair, but its first wearing when complete was tonight for photos!

Total cost:  The coutil was about $34, and the busk was something like $12.  I tend to keep steel boning and grommets on hand, so those were out of my stash.  The quilter's cotton and blue silk were in my stash too.  The lace was maybe $8.  So $54, not including the cost of the items I already had on hand.

January 26, 2013

This n' That

I've got a little bit o' this n' that to show you today.  First up, the current work in progress:


 Part of why I hadn't completed the blue corset is because I didn't know how I wanted to finish it.   Since the current Historical Sew Fortnightly Challenge is to finish a UFO, I forced myself to make a choice.  The blue silk above is leftover from a previous corset, and the lace is a vintage piece I picked up at Lacis.  I haven't attached them yet, but I've been trying them next to the corset to see how they look.


 I'll use the blue silk to bind the edges, then attach the vintage lace all along the top.  I think it's going to look pretty fabulous.  Later on I might do some flossing in a blue silk to match the binding, but for now I just care about getting this off my UFO pile.  I'll have this done within the next day or two, and then I can move on to the next project.


 I've been looking at a lot of antique wooden busks on various museum sites lately.  Check out this beauty at the Winterthur Museum.  Since I've got access to scrap wood, bandsaws, sanders and lasers, I decided to try my hand at making one.  It's not very historically accurate, but I'd rather play with lasers than do hand carving right now anyways.

 In other news, I've been bad again.  After buying a gazillion saris off of eBay last year while planning my Titanic Gown, you'd think I'd have enough.  Nope!


 This beauty is destined to be a Regency dress.  It's a printed cotton sari, and it's gorgeous!  The border runs the length of the sari (5 yards), so I'll get to have a dress with a pretty bordered hem.  I haven't yet decided whether I'm going to incorporate the decorative end into the top somehow or save it for something else.


I had a nice surprise in store for me when it showed up.  The fabric is a changeable cotton!  The warp threads are a wine color, and the weft threads are orange, giving it a different appearance depending on which way you look at it.   The colors of this sari aren't nearly as bright in person as they seem on my computer screen (no idea what they look like on yours) but the color shift is still pretty noticeable.

Wine warp and orange weft gives this cotton fabric its special appearance.

I want to get started on this right away, but I'm going to be good and make my underpinnings first.  That means I'd better get my butt in gear and start researching Regency stays.

I also got a few other pretties in this order, though I haven't a clue what I'm going to do with them.  They were just so beautiful I couldn't pass them up.  First up is this crazy awesome green sari with tons of goldwork and tambour embroidery.  Seriously, it's so pretty I'm afraid to do anything with it.


Damn, right?

The last piece is this amazing skirt that is also covered in goldwork.  It's not destined for any project, as I intended to wear it a time or two before deciding what to do with it.  I've since discovered that it's waaaaaaayyy too long for me (comes up to my boobs!) so I will have to make some sort of alterations to it.  It also very much needs a vodka bath.  For now, I'm content to just look at it.


Anyways, back to work.  I really must get sewing, since all I seem to be doing is acquiring more projects!

January 24, 2013

Making a Corded Petticoat


In the middle of all the craziness that was Dickens Fair and the holidays, I got the irresistible urge to make a corded petticoat.  I am obviously not sane.  Here's how I went about it.

First off, I chose to use cotton organdy.  I've used this stuff for years as an interlining in bodices, but it's also great for petticoats!  While the cords do most of the work of making the petticoat stand out, there's no reason you can't help them along with your choice of fabric.  I got my organdy from Stone Mountain and Daughter in Berkeley.  Most of the time I've gone there they've had two kinds; one is a very fine, high quality fabric (with a price to match) that I use as an interlining for nice bodices, while the other is cheaper and perfectly fine for petticoats and such.  Beware, the cheaper one feels like rough paper and is too stiff straight off the bolt.  Once it's washed it has a much better feel to it, and it retains the perfect amount of stiffness. 

There are two main ways to hold your cords in your petticoat.  You can make a single layer petticoat with tucks to hold the cords.  Maggie's fabulous corded petticoat would be an example of this method.  When using tucks, you'll need to make your petticoat much longer to start with, as it will get shorter with every tuck sewn.  Your cords will also be spaced apart at least the width of your presser foot.  There are many beautiful examples of this technique, and I do like it.  However, for this one I really wanted the look of cords butted right up against each other, so I had to use the second method.

An example of corded tucks, using a single layer of fabric.  The
width of your presser foot dictates how close the tucks can be.

If you want your cords packed together tightly with no space between, you'll have to use two layers of fabric.  You can use two separate pieces of fabric, or you can simply fold your fabric in two, with the fold becoming your bottom hem.  I folded up the hem of my fabric about 15" and put all the cords within that space.

An example of cords sewn between two layers of fabric.
This method allows cords to be placed right next
to each other, with no space in-between.

While the above examples use fat cords (saves time, goes quicker), I wanted the look of lots of tiny rows of cording.  I've used synthetic rattail in corded corsets before, but I wanted something in a natural fiber, and something that would be relatively cheap considering I'd be using lots of it!  I ended up using Sugar 'n Cream cotton yarn after seeing Koshka's beautiful hand-sewn corded petticoat

I ended up using the whole dang thing,
and this was just a short petticoat!

I started off with a piece of fabric 100" by 45".  I sewed the two short ends together to make a tube about 99" wide, then flipped up the bottom edge about 30" with wrong sides facing together and pressed the fold.  I wanted a bit of space at the bottom before the first cord, so I stitched my first line about 1" up from the folded edge.  I then swapped to a cording/zipper foot.  I sandwiched a cord between the two layers of fabric and butted it up as closely as possible to the line of stitching.

Only two rows in, eleventy-billion to go!

I found that pushing it most of the way into place between the layers, then using my fingernail to push the cord into place from above helped quite a bit (see photos below).

Cord between two layers of fabric

Cord scooted close to finished rows

Use fingernail to snug cord right up against finished rows.

I stitched the cord in, pausing every foot or so to stuff and scoot more cord into place.  Rather than make a full row, then start over on a new one, I just kept going in a spiral fashion.  Had I ended each cord and started a new one, the petticoat would have buckled along the line where all the rows of cording ended.  Spiraling the cord also allowed to just continue sewing without pause until I felt a section was complete.

You can see where I started at the bottom and ended 25 rows later. 

I didn't really plan out a design ahead of time, so I sewed cords until I liked the result, then skipped an inch and started a new batch of cording.  I ended up with a total of 56 rows!


When I started, I was just messing around and wasn't sure if I was making a short petticoat or a longer one.  I ended up deciding on short, so I folded the excess fabric at the top over and flat felled it to the top edge of the layer I'd folded up in the beginning.  That left me with a finished length of about 20".  For the sake of being able to wear it immediately, I put an elastic waistband in.

Felled seam and elastic waistband

A short corded petticoat like this isn't exactly historical, but I thought I might use it under some knee-length skirts for now.  I may replace the elastic with a proper waistband in the future, or I may take the waist out entirely and use this as a corded flounce on a longer petticoat later.  I might also add some lace along the bottom edge.  For the time being, I think it's cute and functional as is! 


Have you made a corded petticoat?  It's a lot of work, so show off a bit and link to your creation in the comments!